


HOW TO: CUSTOMIZE MACBOOK FOLDERS
- Lizzie V.
- May 16, 2020
- 2 min read

You guys-- I recently just discovered something so cool! In this post I'm going to show you how to make your MacBook folders go from this..

TO THIS!!!

Disclaimer: These steps are specifically laid out for Apple MacBook users. I have the 13-inch MacBook Pro. I am not responsible if these steps do not work for your specific Mac. If these steps do not work with your MacBook, feel free to contact me with questions, or go and look for another tutorial! There are tons out there!
Let's Get Started: STEPS TO CHANGING THE COLOR OF YOUR BORING FOLDER ICON
Step 1: Create a New folder. Name it.

Step 2: Using two fingers, (at the same time) click on the folder to open up a drop down list of commands.

Step 3: From that drop down list, click "Get Info"

A window like this should pop up:

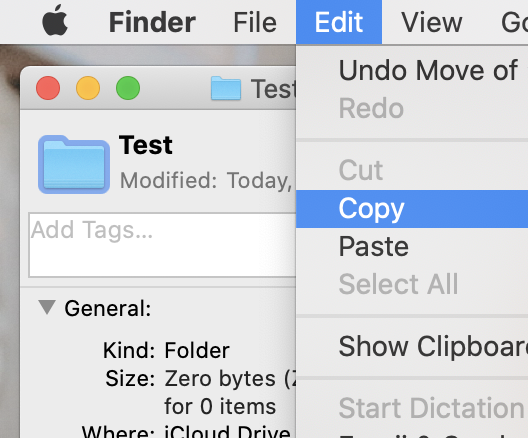
Step 4: Click on the mini blue folder icon (top left) and make sure the folder is outlined in blue *THIS IS A CRUCIAL STEP*

Step 5: Click "Edit" on the top menu > Click "Copy"


Step 6: Down at your dock, open up Finder.

Within Finder, on the the left side click "Applications."

Step 7: Scroll down to find and then select, "Preview".

Step 8: Click "File" on the top menu > "New from Clipboard". You should now see a big blue folder on your screen opened up in Preview. *For reference use the back and forward arrows on the screen below to navigate through the pictures*


Step 9: In "Preview", click the "Markup" feature to open more editing tools. Click the "Triangle/Prism" looking shape to start adjusting the color of your folder!
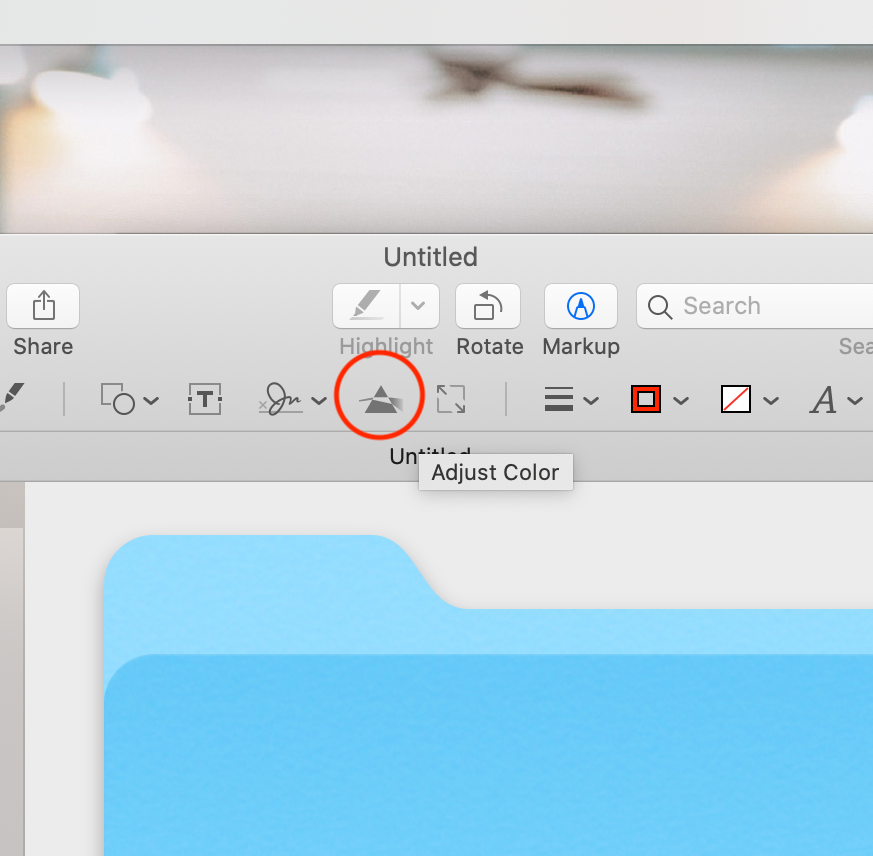
Step 10: Now you should be looking at your "Adjust Color" window. Play around with the "Tint", "Temperature" and "Saturation" to get your desired color!

Step 11: Once you have chosen the color you want your folder to look like, exit out of the "Adjust Color" window. Now, hover your cursor in the top left corner area of the folder, and you should see that your cursor has changed from an arrow to a plus sign.

Step 12: From the top left corner, click and drag the dotted square lines to surround your folder.

Step 13: From the top menu, click "Edit" > Click "Copy"


Step 14: REPEAT STEP 2
Step 15: REPEAT STEP 3
Step 16: REPEAT STEP 4
Step 17: Select "Edit" at the top menu > Click "Paste." The mini blue folder should now turn the color you created and you may exit out of everything! No need to save.

NOW YOU'RE DONE!

IF YOU'VE MADE IT TO THE END, CONGRATS! I HOPE THIS WORKED FOR YOU!
Feel free to share your new and improved MacBook folders with me, by leaving a comment and attaching a picture below!

Comments